")
Price : $55.20
Product Description
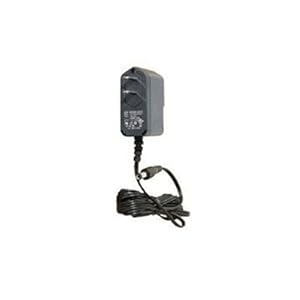
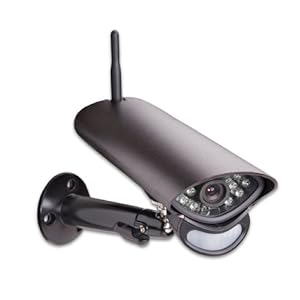
Specs: Image Compression Format: M-JPEG standard Image Resolution: VGA(640x480) / QVGA(320x240) Sensor: 1/4 inch CMOS, 300,000 Pixels Light frequency: 50Hz, 60Hz or Outdoor Audio compression: ADPCM Data rate: 802.11b: 11Mbps (Max.), 802.11g: 54Mbps (Max.) Ethernet: One 10/100Mbps RJ-45 Viewing angle: 67? Horizontal Rotating Angle: 0~270? Vertical Rotating Angle: 0~120? Alarm Mode: motion detection alarm and I/O alarm Video Display: Microsoft Media Player Image Transfer Velocity: 30fps VGA Image Display: single / quad Minimum Illumination: 0LUX Video Format: AVI Network Interface: Wi-Fi/RJ-45 10-100 Base T Network Protocol: TCP/IP, FTP,SMPT, HTTP, ICMP, PPPoE Monitor Mode: Firefox Software Upgrade: Automatic upgrade Security: User management system, password protection Password Setting: administer, monitor, scrutiny Working Condition: -10?C~ 50?C , 20% - 80%PH Power Adapter: DC5V/2A 50/60Hz Operating System: Windows 2000/Windows XP/Windows 7 and Apple MAC ? Package includes: 1 x IP Camera 1 x Antenna 1 x Base 1 x Power Adapter 1 x Network Cable 1 x CD Driver Screws Review Works under both Apple MAC and Safari. However, browser must be run under Firefox. To choose your browser, please enter into the IP camera home page and select Firefox
")
Client Reviews
The camera I got was branded EasyN, but the box art shown on the item information page matches the box I got. Some persons claim they have Foscam, Apexis, Hootoo, and so on. brand, but I feel it really is the exact same camera branded in distinctive brands to accommodate diverse markets. I admit, it would Help if you are tech savvy or at least have some knowledge in network configuration to expedite the set up and get the camera operating, but that's not necessary. This camera is not exactly the most fool-proof camera in the industry, but its function make up for it.
The instructions are readable, albeit choppy due to the poor Chinese-to-English translation. OK here's the deal. I'm going to write a lengthy semi-review, semi-how-to for this amazing IP camera seeing the need to have for an instruction for Mac users. Very first of all, I am a Mac user operating on OS X 10.7.two Lion and I got this poor boy up and operating inside an hour. For all you Mac users out there, you are going to will need to have temporary access to a Windows machine.
If you do not have a Windows machine, see UPDATE four at the end of this review - then follow actions three and forward. I am writing this assessment under the presumption that the typical user has no understanding of MAC access manage list or WiFi DHCP client table from your router to set-up the camera it by way of WiFi. You have to have it to run the application that enables you to detect and configure the camera's IP. However, this application is written for Windows only. But that's all you need a Windows machine for. Once you configure the camera's IP address to work with your LAN, then you can use the web interface and configure a entire sleuth of other possibilities, like the alarm function, FTP, Mail and other. So devoid of adieu, let's do this!
I've taken screenshots to help accommodate the mini guide below. So check out the user-submitted images for 7+ pictures I've added for directions on how to proceed. The instruction is for connecting the camera to a LAN - I chose this route considering that my WiFi network is secured more than various layers of security (Sonic Wall fire wall, MAC manage, etc.) and it really is just less difficult to get the cam up and operating via the LAN.
.) Connect your IP camera to your LAN by way of ethernet and plug in the power provide.
1.) Get access to a Windows machine. I dual-booted to Windows Vista via Boot Camp. Make certain this Windows machine has access to your LAN.
two.) Run the application with the file name, DevFind.exe - you can acquire it in the directory, /EasyN F2 series IP camera installation CD/software program. My included install disc was a blank CD-R disc! so I had to download the CD content material ZIP from the manufacturer's net web site: "easyntech . com / ShowDownload . asp ? id = 34" you can download the manuals in PDF format from the web site also).
three.) Run the DevFind.exe to locate your camera, then modify the camera's IP address so that it matches your LAN's IP range structure, subnet mask and gateway. The default IP address assigned to the camera should really be indicated in a silver sticker situated underneath the camera. The exact same sticker can also be found on the exterior of the box. Generally, the default IP need to be something along the line of 192 . 168 . 1 . 126 and access port 81 (it could be diverse). Considering that my LAN's IP range structure is 192.168..x, I have assigned the camera an IP address of 192 . 168 . . 155. I changed out the default port of 81 to 310. Comprehend me so far? As soon as you got that down, click on the "APPLY" button to make the adjustments.
4.) Click on the "Others" tab under the Gear Details field. Take note of the details located in the "MAC" field, it need to be a 12 letter/quantity string of characters.
5.) If you have access controlled enabled in your router, then follow this step. If not, you can skip. What access manage means is you only enable certain network devices permission to connect to your LAN. Even if the connecting client knows your WEP/WPA/WPA2 password, they still will not be able to connect to your Wi-Fi unless their device is registered to the access control list. The unique identifier of the network device is its MAC address. If you have this enabled, then add the camera's MAC address you've just jotted down in the prior step to your router's access control list. The convention must be XX:XX:XX:XX:XX:XX exactly where X is a quantity or a character from the alphabet. So if your camera's MAC address is 00A8F700F341, enter it as 00:A8:F7:00:F3:41 Update and restart your router after entering. If you have the signifies to reserve IP address designation on your router, I would do so. Considering that I assigned the camera an IP address of 192 . 168 . . 155, I would reserve this address on the router to the camera's MAC address so that this IP doesn't get reassigned by the DHCP to yet another network device by accident.
6.) You'll undoubtedly need to port-forward your camera if you program to remote view from outside. In your router setup, go to the "Port Forwarding" page - it is commonly under "Advanced setup" or one thing similar. Considering the fact that I assigned the camera a custom port of 310, I would enter the port range beginning and ending at 310 to be forwarded to the camera's IP address of 192 . 168 . . 155 .
7.) Next, you should be in a position to punch in the IP address and port number you have assigned to the camera as noted on step 3 onto your internet browser and launch the net-based utility app e.g. http:// 192 . 168 . . 155:310. When you 1st attempt to access the camera through a internet browser, it will ask you for a username and a password. This information is located underneath the camera and also on the box. It is quite often "admin" for the username and a blank password, but double check your equipment.
8.) Select the viewing system if you are employing IE pick the first link, if you're utilizing Firefox, select the second link, and so on.
9.) View your camera, control it, etc
ten.) Click on the Solutions icon to access the internet-based configuration app, or punch in http:// 192 . 168 . . 155:310 /admin2.htm to access it directly
11.) Configure all sorts of other goodies, such as FTP access, Email, alarm, DDNS, Alias, etc.
12.) If you want to view your camera from remote (i.e. outside of your house network), assuming you have a static IP, then you have to have to punch in your ISP assigned IP address, followed by your port. You can uncover out your ISP assigned address by going into your router and searching at the details situated in the "fundamental setting" location. Thanks to daniel for pointing this out. If you have a dynamic IP address, then I advise signing up for a dynamic DNS server, such as dyndns.org. Be certain to update the DDNS area of the net utility with the proper login credential to your dynamic DNS provider.
I am operating on the wireless LAN setup, so I'll edit this assessment when I have a certain fire way to set it up so I can append a very simple how-to to help folks get started. Any question, just comment. Once again, this is from a Mac OS X Lion ten.7.2 user (at the time of this writing).
Considering that I am a Mac user, the IP Camera utility is USELESS (unless you happen to be utilizing Parallel or Fusion to run Windows). I rely solely on the web-based interface to view the camera. It operates like a charm so far. The camera's pan and tilt feature is SUPER rapid. Of course, that's considering I set it at the fastest level you can set it according to your taste. You can set up the Alarm feature so that its motion detector can choose up motion contingent on how sensitive you set the camera to behave. As soon as the alarm mode is triggered, you can additional instruct the camera to upload screenshots at set intervals to an FTP server and/or e mail you the screenshots to an e mail address (see photos). You unquestionably don't will need to be Cisco or A+ certified to get this camera to work.
EDIT: As for scheduling the motion-detector, it works if you set it correctly. From the net-configuration utility, click on "Alarm Service Setting." Set the sensitivity level, etc., then check if you want to have the camera email you and/or take screenshots of events triggering the alarm and upload to a designated FTP server. I checked both. For the scheduler, check "Scheduler" to bring up a week calendar with hour. Click on the hours you'd like the camera to trigger its motion-detector, then press "Set". Note that the alarm mode won't go into have an effect on just after about 30 seconds after rebooting. I didn't know this at first and believed this feature was defunct from factory. I am guessing the camera is giving you time to evacuate the premise before arming itself. The scheduling calendar is extremely cumbersome, so it is probably easier to just turn on or turn off the motion detector.
Also since you want World-wide-web Explorer to use the ActiveX enabled internet interface, Mac users will luck out. The IE version of the internet interface allows you to record video (AVI format), take a snapshot, listen and speak via your camera, along with the potential to command various cameras. It also appears that the remote on/off switch works with the ActiveX IE manage interface, but doens't for the other interfaces. I haven't had time to totally test them.
UPDATE 2: I reside in an apartment complicated exactly where I gave permission to the leasing staff to deliver packages into my apartment when I am not house to sign for it. I set up the camera for motion detection and it picked up the delivery, snap a couple of shots and emailed to me in addition to continuously snapping shots in 5 seconds interval and uploading it to the FTP server. Merely amazing for $5x.00.
I am so impressed with this camera I'll be acquiring two additional units, possibly in white so they can blend with the white walls.
UPDATE 3: For WiFi, make positive your router is 802.11 a/b/g compatible and set at two.4ghz frequency. The IP camera will not choose up your router if it's set at 5 ghz at N-mode only... Read more›
Beware of this cam unless your have fantastic network and webcam setup knowledge. The instructions are so poorly translated into English that it really is laughable. The setup software will stump you speedily unless you know your way about network config, IP cams and the particulars of your current home network. The included "Super Client" computer software appears to be a trial item that you have to decide to purchase if you want to use it longer than one particular hour per day. I don't recall any mention of that in the Amazon item descriptions. At least I can't locate any included reg code and each time your run the software you are prompted to download a new version...the very same version you just downloaded.
The cam displays fantastic excellent video. Pan and tilt operate fine. Ftp solutions are literally non-existent. For example, I need to ftp for the duration of daylight hours only. There is no way to schedule ftp...it is either on or off. Period.
Related Product
No comments:
Post a Comment